Wednesday 15 September 2010

ORA-01422: exact fetch returns more than requested number of rows

consider having the table listed below:

CREATE TABLE employee
   ( 
 emp_id,  
first_name VARCHAR2(50),   
salary FLOAT(126)   
 ) 
populated with many records (table can have a primary key etc.- out of scope)
If you try to execute the pl/sql below you should get an error
ORA-01422: exact fetch returns more than requested number of rows

declare

name varchar2(40);
sal number;

begin

select salary into sal from
employee;
dbms_output.put_line(sal);

end;

This is because the sql query returns more than 1 rows. In order to get all records you could use:

declare

cursor c1 is
select first_name, salary from employee;
l_rec c1%rowtype;

begin
open c1;
loop
fetch c1 into l_rec;
exit when c1%NOTFOUND;
dbms_output.put_line(l_rec.first_name||' '||l_rec.salary);
end loop;
close c1;
end;


Results
George 1200 
Jenny 2300 
Julia 9000 
Mary 9000
Statement processed.

Perform SQL query using LIKE with bind variables

Recently, I have been searching how to use "like" with bind variables in APEX and I came up with following:

select first_name, last_name
from user_details
where
(first_name like '%'|| :P1_USER||'%' or last_name like '%'|| :P1_USER||'%' )
and status='student'

It is up to you how you want to use % (at the beggining or at the end).

Wednesday 28 July 2010

Oracle SQL Developer - UNIT TESTING

In order to create unit tests for oracle's procedures of functions you need to download sql developer. Follow this link: http://www.oracle.com/technetwork/developer-tools/sql-developer/overview/index.html

I will start explaining how to create unit test. The purpose of this post is not how to use sql developer. If you need to establish a new connection follow this link: http://www.oracle.com/technology/obe/sqldev/sqldev.htm

Create the following table


Then insert the following values


Now if you check the data of your table you will see the following:


Next create the following procedure


On the menu under Tools go to Unit Test and click "Select Current Repository"


Select your Repository Connection


Enter Your Username and Password


Add this point follow the guide to create the repository. You will need to grant permissions.
When you are done under View click Unit Test


A new tab on the left appears about Unit Test


Click right click on Tests and then "Create Test"


Specify your connection and then select the procedure that you created earlier "ADD_BONUS" and click next


Select "Create with single Dummy implementation" and click next


Select "Table or Row Copy"


Then click Browse and select the table "Accounts". Click OK and click OK again.


Next Click Next


For expected Result select "Success" and click next


For Process Validation select "Query Returning Rows"


Then you will the process Validation window. Enter the sql query that will be tested.
Select first_name from accounts where balance=3750


Then choose at step 6 select "Table or Row Restore". A new window "Teardown Process" will appear as the following. Click OK.


Finally, you will see a summary of the test that you are about to create. Click Finish.


On the left under test click on the test that you just created.


On the right you can see the details of the test. For the two input variables add
AC_ID ----> 234568 and
AC_BALANCE ------> 0.5


Now, click the debug icon on the top


Click "Yes" to save changes


As you can see the test was successful


Now if you click on the button next to debugging (run test) you can view
the results of the test.


The test was successul because we added 0.5 for AC_BALANCE
which means the following:

for customer 234568 the balance was 2500. After running the query
we said select this customer where balance is 3750.
Hence, after running the procedure we get
2500+2500*0.5 = 3750

If we set AC_BALANCE to 0.6 the the test will not pass.


If you wish to test a function (returns a value) instead of a procedure the steps are the same.

Consider the following table:


with some data like the following


Create the following function


Follow the same steps to create the test. When the time comes to enter the sql query which you will test write the following:
select sum(max_persons) from ab_slots where booking_id=1


For the "In" variable (input) enter 1 and for the "OUT" variable
(result) enter 16.


Click the debug icon to view the result of the test


References
http://www.oracle.com/technology/obe/11gr2_db_prod/appdev/sqldev/sqldev_unit_test/sqldev_unit_test_otn.htm


The SchoolNet Project

The SchoolNet project is aiming to create collaborative learning through Information and Communication Technologies (ICT) [2]. The project is used in rural areas such as Africa [4] and ASEAN (Association of Southeast Asian Nations). The main goal of this project is to improve the quality of education, by means of interaction between students, teachers and schools. The project is trying to connect schools to the internet and create a network of schools.

Methodologies
In order to effectively apply the project, specific methodologies have been used [5]. Initially, “pilot” schools have been chosen in order to test and evaluate the project. The modules in the “pilot” focused on mathematics, science and language. The selected institutions were secondary schools with students of the ages between 11 and 18. In the beginning of the project, the teachers and students of the involved schools were trained in the use of ICT. The next step was to collect 1 data from the “pilot” run in order to be evaluated. The difficulty with the evaluation was the amount of human power needed. In order to overcome this problem UNESCO [1], which was the main contributor, had an evaluation tool for workshops. Therefore students could work using the “pilot” learning circles activity.

The “pilot” learning circles activity are inter-classrooms collaboration models. Each circle is connected to 6 to 8 different classes. These classes can be anywhere because they are connected to the Internet. In each class an investigation is taking place which collects data from the class. At the end, each class shares the data obtained with the whole circle as shown in Figure 1. The circle consists of six phases. These are: getting ready, hello, investigation, data collection, sharing saying goodbye (for more information see [3]).

Figure 1: SchoolNet Collaboration circles

The last step was the evaluation and the monitoring of the framework. The evaluation was focused to measure the impact that the project had on students and teachers. In order to monitor the length of integration, questionnaires were created in order to be filled by all the involved parties. Furthermore, additional information would be taken into account such as the skills of each individual teacher or student [5].

Expected results

A number of results are expected from this project. The techniques that will be used in different countries, especially the innovative, will be shared and documented [5]. A model will be developed which will guarantee the successful integration of ICT in schools and the full establishment of SchoolNet. After evaluating the project, ICT will be integrated into schools. The SchoolNet will start operating in specific modules. The resources of teachers will be increased and additional skills will be developed. The teaching experience and the quality of education will be improved. The students will be able to exchange information, resources and have access to knowledge.

The SchoolNet Project can change the learning experience in the globe. Besides, it can help students from rural areas to interact with students from more educationally advanced cultures. This will assist them to enrich their knowledge. The consequence will be the recognition from knowledgeable societies. Hence, this will give the opportunity to create on-line learning societies which will involve different people from different backgrounds. The main issue that the SchoolNet project is failing to address is the assistant of rural areas which do not have the appropriate infrastructure. For example, in rural areas in India there are a small number of schools. The schools are in great distances which make the accessibility very difficult for a large numbers of students. In these cases the SchoolNet project would not make any difference.

Bibliography

[1] http://www.unescobkk.org/education/ict/.

[2] http://www.unescobkk.org/education/ict/ict-in-education-projects/teaching-andlearning/

unesco-schoolnet-project/.

[3] http://www.unescobkk.org/education/ict/ict-in-education-projects/teaching-andlearning/

unesco-schoolnet-project/asean-bridges-to-learning/training-course/phase-1-

getting-ready/.

[4] Glen Farrell and Sha_ka Isaacs. Survey of ICT and Education in Africa: A Summary

Report, Based on 53 Country Surveys. 2007.

[5] UNESCO. Evaluation and Monitoring Activities UNESCO SchoolNet Project. 2006.

Tuesday 27 July 2010

Two Level Tabs - APEX

As many new developers in APEX find it confusing to use two level tabs in their applications, I have created a detailed example concerning this issue.

Click on the icon "Application Builder"

Then Click on the "Create" button to create a new page.


Select "Create Application" and click next.


Then for "name" enter tabs and choose to create your application from scratch. The application id can be any number and the schema will be your own DBs schema. This is irrelevant to this example. Then click next.


For page type select "Blank" and click on the "add page" button to add this page. Then click next.


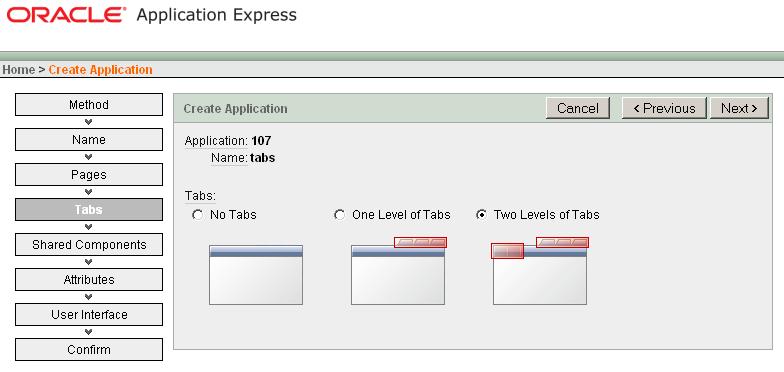
Select two level tabs


For "Copy Shared Components From Another Application" select NO and click next.


Your authentication scheme can be any of the 3 options. This is up to you. For this example, I am not using any authentication so I have chosen "No authentication". After choosing the scheme you want click next.


Then choose any theme you want for your application. I have chosen "Theme 3". Click next.


Then click the "Create" button to create your first page.


If you go to your application's page you will see what is in the image below

Click on the "Create Page" button to create another page. Select "Blank Page" and click next.


For Page Number add 2 and click next

For "page name" add and click next.


The next part is about tabs. For "Would you like to use tabs for this new page" select NO. You will do this later. Click next


Finally click "finish" to create your page


Follow the exact same steps to create another 3 pages.
Page 2 (page name-->Page 2, page number-->2)
Page 3 (page name-->Page 3, page number-->3) and
Page 4 (page name-->Page 4, page number-->4)

In your Application page you will see the following image. Click on "Shared Components"


And from there click on "Tabs" on Navigation.


What you will see is the following image:


Click on the edit image of the parent tab on the top (Page 1). Change Label to "Parent 1" and click apply changes.


Then click on the edit icon of the child tab on the left (Page 1)


Change Tab Label to "Child 1(a)". Then in the "Current For Pages" section in "tab also current for pages" add 1.


Finally, in "Parent Tab Set" section select main (if not selected by default). Click Apply Changes.


Then click on "Add" in child tabs to add another child tab.


For "Tab Label" enter --child 2 (a)--


For "Tab Current For Page" enter 2.


For Sequence enter 20


For "Condition Type" choose -No Display Option-


Finally, click on the "Create Tab" button.


Then click on the edit icon on the child tab that you just created (child 2 (a))


In section "Current for Pages" for "Tab also current for Pages" add 2


For "Parent Tab Set" select "main" and click on "Apply Changes"


Then click on the "Add" link in the parent tab bar to add a new parent tab.


For "Parent Tab Label" enter -Parent 2- and click next


For Page enter 3 and click next


For Sequence enter 20 and for "Condition Type" select -No Condition- and click "Create Parent Tab"


Now what you see is the image below


Click on the "Add" link on the left to add a child tab for this new Parent Tab "Parent 2"
For Tab Label enter "child 1 (b)" and click next.


For "Tab Current For Page" enter 3 and click next


For Sequence enter 10 and click next.


For "Condition Type" select -No Condition- and click next


Finally, click on the "Create Tab" button.


Then click on the edit icon in the child tab that you just created (Child 1 (b)).


In section "Current for pages" in "Tab also current for pages" enter 3


For "Parent Tab Set" select "main" and click on the button "apply changes"


What you now see is the following image. Click on the "Add" link on the left to add another
child tab.


For Tab Label enter "child 2 (b)" and click next.


For "Tab Current For Page" enter 4 and click next


For sequence enter 20 and click next


For "Condition Type" select -No Condition- and click next

Finally, click the "create tab" button


What you see now is the image below. Click on the edit icon for child tab (child 2 (b))


In "current for pages" section in "tab also current for pages" enter 4


For "Parent Tab Set" select main and click "Apply Changes"


At this point you have created your two level tabs.


Go to your application's page and click "Run Application" (or click on the run icon at the top on the right)


Below you can see 2 screenshots with the two level tabs pages.


In the same way you can add as many tabs as you wish. If you want more than one pages to be
under the same parent and child tab then on the section "Tab also current for pages" add page numbers seperated with a comma (4,5,6,7 etc).